

Garlic
 Common garlic originated in central Asia, probably from a wild species but now occurs only in cultivation. It does not produce true seed. It is propagated vegetatively by planting cloves (called seed) obtained by breaking the bulbs apart or by planting bulblets which certain varieties produce on a seed stalk instead of flowers.
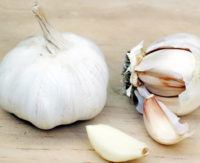
There are many different varieties of garlic, and 2 main types: soft neck and hard neck.
Soft neck/non-bolting type (Allium sativum sativum)
This is the main type grown commercially in California. It rarely bolts (produces a seed stalk). It has larger bulbs with numerous cloves of variable size in a somewhat random arrangement. Heads have 6-18 cloves in layers around a soft central stem. The clove skin varies from white to pink, rose or purple. It has a good storage life. Soft neck garlic includes the following groups: Artichoke (California Early and California Late), Silverskin, Creole, Asiatic, and Turban.
Hard neck/bolting/stick garlic (Allium sativum ophioscorodon):
This garlic, also called ‘stick’ garlic usually bolts and produces small bulblets instead of flowers, on top of a seed stalk. It usually has smaller bulbs with fewer cloves that are more uniform in size in a more organized arrangement in the bulb. The cloves are in a single circle around a central woody stem and produce about 5-10 cloves per head. It typically has a shorter storage life than soft neck garlic. Hard neck garlic includes the following groups: Porcelain, Rocambole, and Purple Stripe.
It is best to buy garlic for planting that is certified ‘disease free’ from a nursery or seed catalog. Planting garlic purchased at a super market or obtained from a friend is risky. It could have pests like mites or white rot, a fungal disease which attacks garlic and other members of the onion family. If you grow healthy garlic you can save the largest, healthiest bulbs to replant the next season.
Garlic is sensitive to day length (photo period). Bulb formation is triggered in spring as day length increases. Bulbing will begin at the same time no matter when you plant garlic. To obtain the largest bulbs garlic should be planted in fall. This lets the plant produce a strong root system so it can begin producing leaves in late winter or early spring. To obtain the largest bulbs you want to have a plant with the maximum amount of foliage when bulb formation begins. If garlic is planted in winter or early spring instead of fall it will produce less foliage and the bulbs will be smaller when harvested.
Garlic also needs some winter chill to produce bulbs. Soil temperatures below 50 degrees F. for several days are enough to stimulate leaf growth. Cold induces garlic to sprout which is why bulbs should not be stored in a refrigerator.
Soil preparation
Grow garlic in well-drained soil where it will receive full sun all day. A loamy soil is ideal but garlic can also be grown in other types of soil if they are amended with compost and properly managed. To prepare an area for planting, dig soil 8-12” deep. Mix in composted organic matter and a pre-plant (starter) fertilizer. Break clods into small pieces and mix the soil so it has a uniform consistency at least 6” deep. Use a rake to smooth and level the surface.
When soil is prepared spread fertilizer evenly over the area and mix it in 6” deep. You can use a chemical or organic fertilizer or a combination of both types. If you use organic fertilizer or animal manure, mix it into the soil 4-6 weeks before planting and irrigate periodically to leach harmful salts out of the surface soil. Time is needed for organic matter to decompose and release nutrients. If animal manures are used, for every 100 sq. ft. of garden area, apply 10-20# of composted poultry manure or 40-60# of composted steer or dairy manure.
If you use chemical fertilizer (soluble or slow release) mix it into the soil just before planting. The nutrients in chemical fertilizers are immediately available for roots to absorb but heavy rain or irrigation can leach soluble nitrogen out of the root zone. For 100 sq. ft. of garden area, apply one-half (0.5) pounds or about one cup of ammonium phosphate (16-20-0) fertilizer or one (1.0) pound or about two cups of 5-10-5 fertilizer or another starter fertilizer according to label directions. Broadcast the fertilizer evenly over the surface and mix it into the top 6” of soil.
Planting
It’s best to buy garlic bulbs that are certified ‘disease free’. Break the bulbs apart into cloves just before planting. Individual cloves do not keep long due to disease (rot) and loss of water. In coastal areas where winters are mild plant cloves so they are covered with about 1/2 inch of soil. The size of cloves and spacing when planted influence bulb size at harvest. Large cloves produce bigger bulbs than small cloves. Planting cloves too close together will decrease bulb size.
In areas with cold winter temperatures plant cloves deeper (1-2”). Plant cloves 4-6” apart in rows spaced a foot or more apart.
Care
Irrigate thoroughly after planting to wet the soil 6-12” deep, then water as needed to keep the soil moist but not constantly wet. Garlic may rot if the soil is saturated with water for a long period. Garlic has a relatively shallow root system and the top 6 inches of soil should be kept moist when plants are actively growing. Remove weeds as soon as they appear. Garlic is a poor competitor and plant growth will be stunted if weeds are allowed to grow.
Garlic uses a moderate amount of nitrogen. It needs some nitrogen early in the season and more later when plants begin strong vegetative growth. Additions of compost and manure before planting often satisfy the plant’s nutritional needs. If a soluble chemical fertilizer was applied before planting, apply more fertilizer containing nitrogen in winter when plants are producing vegetative growth. Scatter fertilizer evenly a few inches from the plants along each side of the row, then water well to dissolve and carry the fertilizer into the soil. For 100 ft. of row apply one half (0.5) pound or about one cup of ammonium sulfate (21-0-0) or similar fertilizer. No nitrogen should be applied during the last two months before harvest. For good quality bulbs garlic should run out of soil nitrogen late in the season.
Garlic stops producing new leaves as the bulbs mature which makes the neck soften and the top fall over. As garlic bulbs near maturity stop watering and allow the soil to dry. If you continue watering the wrapper leaves will be thin and the bulbs will have a shorter storage life. Garlic can be harvested when most of the tops have fallen over. You can also find out if garlic is ready to harvest by feeling the base of the stem under the soil. If the stem feels firm, the bulb is not ready to harvest. Wait until the stems feel soft, then dig the bulbs and let them dry. Use a garden fork to lift bulbs out of the ground to avoid cracking them. The bulbs will dry faster if you trim the roots back immediately after they are dug. You can leave the plants on the ground to dry for a few weeks if you drape the tops over the bulbs to protect them from sunburn. If you just have a few plants you can place them on a wire screen to dry in a shed or other place that has good air circulation. Good air flow is essential to carry away moisture and cure the bulbs. When completely cured the bulb wrapper should be crinkly, the root crown hard and cloves should crack apart easily. Leave the tops on the bulbs. The longer they stay on, the longer the bulbs will store. If garlic tops will be braided together, do this while the tops still have a little moisture and are flexible. Store cured bulbs in a dry and cool (60-70 degrees F.) place. The relative humidity must be below 70% to prevent mold.
Pests and Diseases
Garlic may be damaged by thrips, mites, cutworms, stem and bulb nematodes, downy mildew, Fusarium basal rot, purple blotch and white rot. White rot caused by the fungus sclerotium cepivorum appears as a cakey, white growth with black poppy seed-size dots on the base of the bulb. The fungus also attacks onions and other allium species. If the fungus is introduced into a garden, it will remain in the soil for many years and you may have to avoid planting alliums in that area.