

Straw bale provides soil-less place for plants to flourish
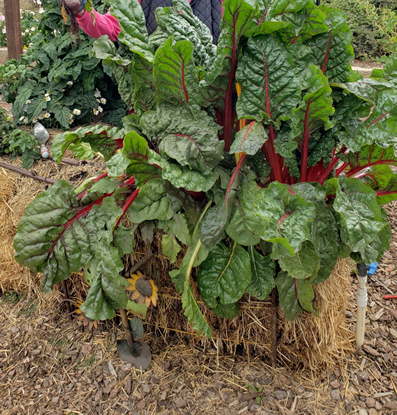
Straw bales provide a nutrient-rich environment for vegetables, herbs and flowers to thrive.(Ellen Cadwallader)
Bundled mass serves as an elevated, surprisingly low-maintenance bed
JOAN MARTIN
(This article first appeared in the San Diego Union-Tribune on October 9, 2021)
It’s fall. All those straw bales you see around can be more than decorative. If you want to start gardening and are faced with rocky soil, hard pan, clay or you’re just tired of bending over, you might want to turn those bales into a lush vegetable or flower garden.
A straw bale garden is a soil-less garden method where vegetables, herbs and flowers are planted directly in the straw bale. The bale is the growing medium, container and raised bed all in one compact package. The San Diego Master Gardener Association has featured straw bale gardens in its Demonstration Garden at the The Flower Fields at Carlsbad Ranch for the past seven years.
What do you need to get started?
Supply needs are minimal. You need a location that has at least six hours of sunlight, a nearby water source, the straw bale, a hand trowel and fertilizer.
Straw bales can be purchased from local feed and tack or farm supply stores.
A straw bale is heavy, so location is important. It needs to be put where it will be used before you start preparing it for planting. Place the bale so the bailing wire is parallel to the ground. The bailing wire will hold the bale together during the growing season.
What’s next?
Once your bale is in place, the next step is to turn the interior of the bale into a rich container for your plants or seeds. This is done through a process termed “conditioning.” Basically, you are turning the inside of the bale into compost. When the conditioning is finished, plants will be growing in the compost, not the straw itself.
Fertilizer and water are added to the bale over a period of 12 to 15 days. You start first with a fertilizer high in nitrogen (N) and switch midway to a balanced fertilizer with phosphorus and potassium (P&K). Spread the fertilizer evenly across the top of the bale and water it in slowly to avoid runoff. Then work the fertilizer deep into the bale.
There are two watering schedules commonly used to do this. One is an alternate day approach where water and fertilizer are alternated with water only for 10 days. The second schedule waters for three days before adding the fertilizer. Both methods work equally well. The second method heats up more quickly but both are nearly the same at the end of the conditioning period.
After conditioning, the bale won’t look any different, but its interior temperature will have risen and the bale will feel hot. Temperatures can rise to over 120 degrees. Check the bale daily until it cools to body temperature or lower before planting. Keep the bale moist during this cool-down step.
What and how to plant
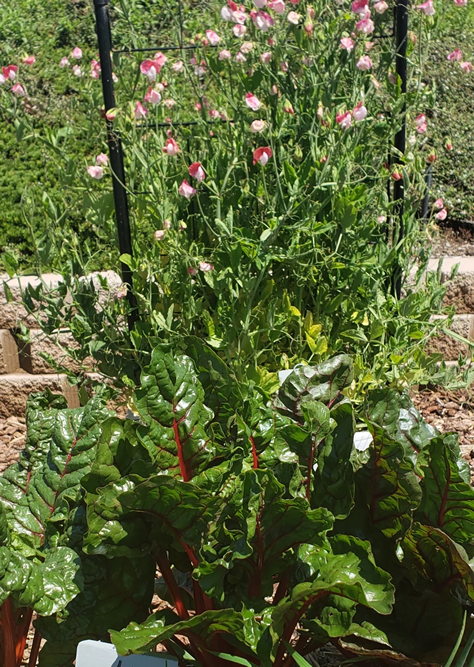
The San Diego Master Gardener demonstration garden at The Flower Fields at Carlsbad Ranch contains chard and flowering sweet peas grown in a straw bale.(Ellen Cadwallader)
A watering system needs to be in place before planting. The easiest way is to lay a soaker hose connected to a water source down the center of the bale.
Select your desired plants. If you want to start from seed, cover the top of the bale with 2 to 3 inches of good potting mix and plant the seeds in this finer mixture. Follow the spacing guide given on transplants and seed packages as you would in a raised bed or regular garden.
To plant transplants from a six-pack or 4-inch pot, use a trowel to make a hole by working it back and forth until it is large enough for the root system of the plant. Use a handful of potting soil to cover any exposed roots.
Maintenance
Watch the plants grow. Keep the bale moist; don’t let it dry out. Little work is required with a straw bale — it practically takes care of itself. And since you start with a new bale each season, you don’t have to contend with any soilborne diseases or rotate crops.
Fertilize every few weeks during the growing season using an all-purpose liquid fertilizer. Watch for nutrient deficiencies. Yellowing of leaves can indicate a lack of nitrogen; purpling of leaves can mean phosphorous is low; and brown leaf edges can indicate a need for potassium.
Bales need to be watered frequently until the roots are established in the center of the bale. Water daily if starting with seeds. Water less frequently as roots spread out in the bale.
This garden at The Flower Fields shows mixed greens in straw bales, a method that uses compost created within the straw to provide nutrients to the plants.(Ellen Cadwallader)
What’s left?
At the end of the season, the bales will not look pretty — they start falling inward — still composting. After you harvest the vegetables or pick your flowers, the spent bales will reward you with rich compost to use as mulch or add to your compost pile.
Advantages
The bales create an immediate raised bed, reduce bending, require no digging or soil preparation, can be placed anywhere you have sun and water, and require no construction of beds. Give straw bales a try. Start small. Plant your favorite vegetables and watch them grow. Then harvest, eat and enjoy, and next year add more bales to your garden.
To learn more about gardening in straw bales, check Joel Karsten’s book “Straw Bale Gardens Complete” and the University of California Division of Agriculture and Natural Resources (ANR) publications from California and Washington Extension Services at https://anrcatalog.ucanr.edu.
Martin has been a San Diego County Master Gardener since 2003. She is a longtime volunteer at the Master Gardener Demonstration Garden in The Flower Fields at Carlsbad Ranch and specializes in vegetable gardening.